This chapter contains the following topics:
Entering and Maintaining Shop Orders
Use this function to maintain Shop Order records, explode Shop Order quantities into component material requirements and allocations, print component picking lists for Shop Orders, and analyze material usage when orders are closed. The maintenance of order quantities in the Shop Order File also automatically updates the Quantity On Order in Item Master and in Branch Warehouse Item inventory records. The "Inventory transactions" function automatically updates quantity received and balance due information in Shop Order records and in the item inventory records.
To use the "Explode" shop orders program on this menu, you must first install PBS Manufacturing Product Definition & Costing and define bills of material in the Product Structure File. If your bills of material are very simple, you may optionally use the "Shop order materials" file maintenance function to define component material requirements for each parent order added, instead of using the explosion program.
Shop orders are the orders you place to produce materials you manufacture in your plant. These are sometimes referred to as Production Orders or Work Orders.
A shop order record is a very simple record. It contains very basic information on the product to be manufactured. Shop orders may be entered in several different places in PBS Manufacturing depending on how your business operates and which modules are being used. These areas include Shop Floor Control, Inventory Management, and Manufacturing Job Costing.
Shop orders may be automatically created when entering sales order line items. This is a wonderful feature in a make to order environment. This option may be turned on or off in C/O Control Information. If using this option, you will be asked if you wish to create a shop order when entering a sales order line item. Answering Y will automatically create a shop order to produce the inventory for the sales order. The sales order and the shop order will share the same order number for easy reference. Additionally, the sales order and customer name will be referenced on many of the shop order related reports.
Shop orders may be manually entered in many places including I/M, S/F, and M/J. Each contains a shop orders menu which will allow you to enter shop orders. All of the entry programs write back to the same set of data so you may use which ever one you wish.
There are other functions related to shop orders such as Explode, Release and Close. Which functions you use will be determined on how you plan to use the system and which modules you have installed.
Explode
This program "explodes" your bill of material for the item being manufactured into a "Shop Order Bill Of Material". This is a list of components necessary to complete the ordered quantity. This is accomplished by multiplying the quantity required (according to the Bill Of Material) by the quantity of the parent required by the order. There are two types of explosions Single and Multi Level. A single level explosion simply creates the shop order bill for the top level parts required by the item being manufactured. A multi level explosion will go much deeper. It will explode the top level requirements for an item just like the single level. However, when it encounters a manufactured component at that level, it will check inventory to see if there is any material available to net against the requirement. If not, it will automatically create a shop order for the balance, and explode the requirements for the new order. It will continue this process for an item until it no longer finds any manufactured components.
Release
This program releases the routing operations for the item being manufactured. The process is very similar to the Explode function, however, it works with the product routing instead of the Bill of Material and only works on a single level basis. This is only a function of Shop Floor Control and will be found in this module's shop order menu. This function imposes load on your production floor. These operations are then scheduled by the Shop Floor Control scheduling function.
Close
This function closes an order and summarizes detail information for historical purposes. If you are running Shop Floor Control it's recommended you perform this function there. Additionally, if Manufacturing Job Cost is installed and you created a Job Master for this order, several additional reports containing summary and detail information on the job will be available.
Reporting Production & Labor on Shop Orders
If you are running the Shop Floor Control or Manufacturing Job Costing modules you have the ability to report production and labor on a job by job basis. The jobs are reported on by routing operation. Each operation represents a step in the process of manufacturing the product.
The setup of the routing will determine how each operation is reported on. Some may wish to report only quantities complete, others want only hours, still others require both. Carefully review the routing setup and learn the various options you have for easing the reporting functions.
If using the Shop Floor Control and Manufacturing Job Cost modules, you will find great flexibility in scheduling and reporting of production. The programs used are S/F Production and Labor Enter, or M/J Employee Labor Enter. You should use the S/F module for reporting production and labor if it's installed.
The combination of Shop Order Number, an optional Release Number, and Item Number establishes a unique Shop Order record. You thereby have the alternative of using the same Shop Order and Release Number for different, but related, manufactured items (for example, a "make to order" product and its manufactured components). You may also setup several Release Numbers, with different Due Dates, for the same Shop Order Number and manufactured Item Number.
Select
Enter from the Shop orders menu.
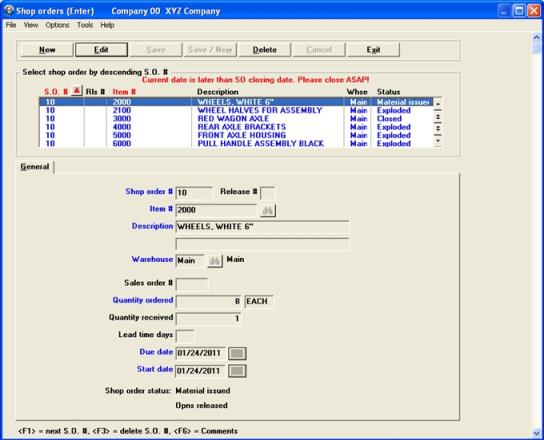
The following screen displays:
The list box displays up to 6 shop orders at a time. You may sort the records by shop order number or item number, both in ascending or descending order. Only column names in red may be sorted. Click on the column name or the arrow to the right of the column name to change the sort or use the View options.
To locate a shop order, start typing the shop order number or item number, depending on which sort field is selected. You may also use the up/down arrows, Page up, Page down, Home and End keys to locate an item. The <F1> and <SF1> function the same as the up/down arrow keys.
Shop orders that display in the list box are available for changes or deletion. The fields for the selected shop order display in the lower part of the screen.
When a shop order is found, you may select the <Enter> key or Edit button to start editing.
There is a row of buttons on the screen where you will have some or most of the following options:
| Button | Keyboard | Button description |
|---|---|---|
|
New |
Alt+n |
For entering a new shop order. |
|
Edit |
Alt+e |
For editing an existing shop order. This option is only available if there are previously entered shop orders. |
|
Save |
Alt+s |
To save a new shop order or the changes made to an edited shop order. |
|
Save/New |
Alt+w |
To save a new shop order or the changes made to an edited entry and start a new shop order. |
|
Delete |
Alt+d |
To delete an existing shop order. |
|
Cancel |
Alt+c |
To cancel adding or editing an existing shop order. |
|
Line items |
Alt+l |
To access the line items screen for an existing shop order. |
|
Exit |
Alt+x |
To exit the screen. |
Enter the following information:
Entry Format: Up to 6 alphanumeric characters.
Entry Format: Up to 2 numeric digits, or default of space.
Comments: Use of Release Numbers is optional, allowing Shop Order Numbers with multiple releases for different due dates.
Entry Format: Up to 15 alphanumeric characters.
Validation: The Item Number must match a record in Item Master.
Comments: Enter spaces to select by description if you wish to search for an Item Number by entering any portion of the first 30 characters of its Description.
Press <F1> to consecutively display Parent Item Numbers for the Shop Order Number and Release Number you have entered.
Entry Format: Up to 30 alphanumeric characters for each line.
Default: The Item Master description fields are automatically entered when you first add a Shop Order. You may later modify that description from "Field number to change ?".
Entry Format: Up to 2 alphanumeric characters, or default.
Default: The item's Primary Warehouse code is displayed as the default entry.
When entering fields to display a record, the Warehouse code in the first Shop Order record matching your Shop Order Number, Release Number, and Item Number entries is displayed as the default.
If this entry together with Shop Order Number, Release Number, and Item Number matches a Shop Order record already, the remaining data fields will display.
Entry Format: Up to 6 numeric digits, or spaces.
Comments: For reference. Not matched to Customer Orders by this program.
Entry Format: Up to 8 numeric digits, without a minus sign.
Comments: The item's Inventory Unit Of Measure displays to the right of this entry.
Quantity received
This field is displayed only, since it can only be updated by "Inventory transactions". The program initializes this value to zero when a record is added.
Entry Format: Up to 3 numeric digits without a minus sign.
Default: The displayed default is Lead Time Days from the Item Master record.
Entry Format: 6 numeric digits, in MMDDYY format.
Validation: Must not match a date entered with Schedule Exception Dates. See Schedule Exception Dates entry and Schedule Exception Dates display.
Comments: If you change the Due Date of a Shop Order, the program asks "Reschedule other items with same S.O. # and Rls # by same number of days ?". Answer Y or N.
If you change the Start Date, or another entry that causes a new Start Date to be calculated, the program asks "OK to change date of S.O. material reqts ?". Answer Y or N.
For jobs comprised of multiple Shop Orders, these rescheduling options may be used to make consistent changes to Due Dates and Material Requirements dates for all related Shop Orders.
Entry Format: 6 numeric digits, in MMDDYY format.
Default: The displayed default is automatically calculated from Lead Time Days and Due Date, using Schedule Exception Dates to exclude exception dates.
Validation: This entry must not match a date in Schedule Exception Dates.
Shop order status:
Comments: Order Status is displayed. This code is automatically set to O (Open) and is updated by other applications; it cannot be modified in Enter Shop Orders. Status codes are:
| Order Status | Explanation |
|---|---|
|
Open |
Open Added to Shop Order File, but not exploded. |
|
Exploded |
Exploded Shop Order Material Requirement records for components are on file for the Shop Order. Status is changed to E by the Explode Shop Orders program, or by the "Shop order materials" maintenance function. |
|
Material Issued |
Issued Some or all required components are issued to the Shop Order. Status is changed to I by the Process Inventory Transactions function. |
|
Closed |
Closed Shop Order has been closed by the Close Shop Orders program and its record can no longer be modified by using Enter Shop Orders. |
When you add an order, if Manufacturing Job Costing is installed and a Job Master Matching the Shop Order Number is not on file, the program asks: Add job cost master ? Answer Y if you want to add the cost master which allows reporting of order costs when you close the order; otherwise, answer N.
If order Start Date is changed and Shop Order Material records are on file, the program asks if you want to accordingly change required dates for Shop Order Materials.
You are only allowed to delete a Shop Order with an Order Status of Open or Closed. If the Order Status is Exploded or Material Issued, you must first use Close Shop Order to close the order and remove related Material Requirement records before you can delete the order record. You may also use Purge Closed Shop Orders to delete all Shop Order records that were closed on or before a date that you specify.
If I/M Control Information indicates you use Shop Order Comments, press F6 at "Field number to change ?" to enter:
Entry Format: Up to 99 lines of 45 alphanumeric characters each, in groups of 10 lines per screen.
Comments: If the answer is "N" to "Use shop order comments" in I/M Control Information, you will not be prompted to add S.O. comments.
If you do you use comments, when you are adding or changing comments, press <F1> to put spaces in a comment field and in subsequent fields in the same group of 10. To delete all comments for a group of 10, press <F1> when the cursor is at the top comment field.
You may also press <F2> at the first comment field to copy the Item Master comments, if any.
Other programs allow you to print Shop Order Comments on Pick Lists or Shop Order Routings.
This program explodes Shop Orders into Shop Order Material Requirements records, using Product Structures (bills of material) maintained in Product Definition & Costing. This process also increases the Quantity Allocated in Item Master or Branch Warehouse Item records for the components.
Shop Order Material Requirement records are the detail of a component item's total Quantity Allocated at a Warehouse, and are subsequently used to record actual issue quantity vs. required (planned usage) quantity for each controlled component used in making the parent item.
The program provides a multiple level explosion option which automatically creates Shop Orders as well as Material Requirements records for lower level manufactured components. Component orders are created only if available Quantity On Hand does not cover the new requirement; when created, they are assigned the same Shop Order and Release Numbers as the parent order being exploded.
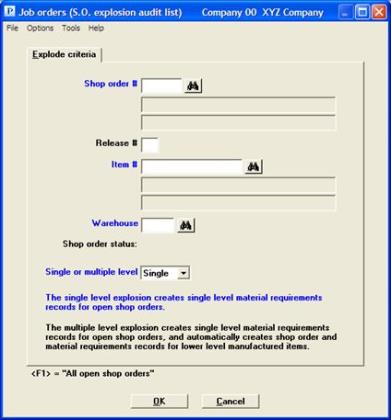
When you select this program a message informs you that:
The single level explosion creates single level material requirement records for open shop orders.
The multiple level explosion creates single level material requirement records for open shop orders and automatically creates shop order and material requirement records for lower level manufactured items.
Select
Explode from the Shop orders menu.
The following screen displays:
Enter the following information:
Entry Format: Up to 6 alphanumeric characters, or
<F1> = "All open shop orders" for a warehouse.
If you use the "All open shop orders" option, the entries for Release Number and Item Number are automatically bypassed.
Entry Format: Up to 2 numeric digits, or default of space.
Validation: Shop Order Number and Release Number must match a Shop Order record already on file.
Entry Format: Up to 15 alphanumeric characters, or press <F1> to consecutively display Item Numbers with the Shop Order Number and Release Number you have entered.
Comments: The combination of Shop Order Number, Release Number, and Item Number must match a Shop Order record on file.
Entry Format: Up to 2 alphanumeric characters, or default.
Default: Warehouse code in the first Shop Order record on file matching your Shop Order Number, Release Number, and Item Number entries is displayed as the default.
Comments: At this point, if you have requested explosion of a specific Shop Order, the program checks to see that Order Status is Open for the order matching your entries. If current Order Status is not Open, the program informs you that the order cannot be exploded and returns you to the Shop Order Number entry position.
Entry Format: Drop down list box with the choices of Single Level Explosion, or Multiple Level Explosion.
Component Effective Dates and Component Fit Times in Product Structure records are used in determining what components are required and the component requirement due dates. Due dates in component Material Requirement records are set equal to the Start Date of the parent order plus any Component Fit Time Days in the component's Product Structure record.
This explosion will "blow through" any component coded as a Transient (Purch/Mfg code in the component Item Master). The components of the Transient are allocated directly to the exploded parent order, and will appear on the parent order pick list.
The Shop Order Explosion Audit List will automatically print when the explosion is completed after which the program returns you to the Shop Order Number entry position.
This report verifies the explosion of the Shop Orders you have selected and lists any exceptions such as "Bill of material not found - Order not exploded".
The audit list for a multiple level explosion will also show any automatically created Shop Orders for manufactured components, or may inform you "Inventory applied - Order not Required" for the lower level manufactured item. If a parent Shop Order is made at a branch warehouse and its manufactured component is supplied by the primary warehouse, "Supplied by primary warehouse - Order not created" will appear for that component on a multiple level explosion audit list.
Another possible exception message on the Explosion Audit List also pertains to the automatic creation of component Shop Orders in a multiple level explosion. The explosion program cannot create a component Shop Order with an identifier (Shop Order Number, Release Number, Item Number, and Warehouse) that matches a Shop Order record already on file. In this situation a message "Duplicate record on file- Order not created" is listed with the required additional order quantity for the manufactured component item.
The duplicate Shop Order condition can occur if a manufactured component appears more than once in the indented bill of the parent item being exploded through multiple levels. To remedy this situation, you may wish to close the first Shop order created for the manufactured component and then add a shop order for the total requirement quantity.
Use this program to print a stock picking list of component materials or parts required to make a Shop Order. The source of information for the pick list is Shop Order Material Requirements records created by the Shop Order explosion, or with the "Shop order materials" file maintenance function.
Any component with Pick List Item ? = N in its Item Master record when its Shop Order Material Requirement record was created will be excluded from the Shop Order Pick List.
Select
Print pick list from the Shop orders menu.
The following screen displays:

Enter the following information:
Entry Format: Up to 6 alphanumeric characters.
Entry Format: Up to 2 numeric digits, or default of space.
Validation: Shop Order Number and Release Number must match a Shop Order record already on file.
Entry Format: Up to 15 alphanumeric characters, or press <F1> if you wish the program to consecutively display Item Numbers with the Shop Order Number and Release Number you have entered.
Or, press <F2> to print pick lists for "All" manufactured items to be made on the Shop Order Number and Release Number entered.
Comments: If you entered a specific Item Number, the combination of Shop Order Number, Release Number, and Item Number must match a Shop Order record on file.
Entry Format: Up to 2 alphanumeric characters, or default.
Default: Warehouse code in the first Shop Order record on file matching your Shop Order Number, Release Number, and Item Number entries is displayed as the default entry.
Shop order status
If you did not default to "All" in the Item Number entry, the status of the selected order is automatically displayed here.
Sequence by primary stockroom location
Entry Format: Check box, checked is yes and unchecked is no. The default is checked.
Comments: A checked box sequences listed components by the Stock Location Codes in their Item Master records, then by Component Item Number. Unchecked sequences the list by Component Item Number.
If Lot/Serial Number Control options are installed, you enter:
List FIFO/On-hand detail for lot control items
Entry Format: Check box, checked is yes and unchecked is no.
Comments: If you check the box, on hand detail of components with the Lot # Control Method is listed in FIFO (First In, First Out) sequence of Date Received.
Entry Format: Check box, checked is yes and unchecked is no.
Default displayed is Checked if S.O. comments option is selected in I/M Control Information.
This is an altered version of the Shop Order Pick List which is a list of items required to manufacture the product being made on a shop order. The information provided on the Pick List includes basic Shop Order information, a list of components and the total quantities required, as well as shop order comments.
The Shop Order Traveler contains all of the same information, and optionally may contain a great deal more information including:
| 1. | Item comments |
| 2. | Sales order comments |
| 3. | And may even include bar codes for key fields (requires a PCL compliant laser printer to use this feature) |
| 4. | Additional information at the top of the form |
The Shop Order Traveler will allow you to print a single document for one order, or will optionally allow you to print all documents for a range of orders. When a range is selected, a document will print for all Shop Orders with a status of Exploded (orders that have yet to be exploded, or have been closed, will not print using a range). Closed Shop Orders will not print.
Select
Shop order traveler from the Shop orders menu.
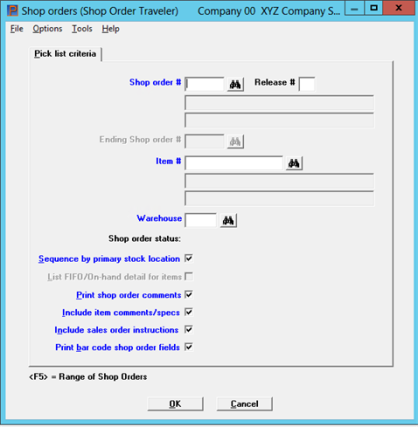
The following screen displays:
Character Mode
The primary difference between Graphical Mode and Character Mode, other than appearance, is items 4-9 are Y/N questions in Classic view while in the GUI view they are represented as check boxes. A checked box is the equivalent of entering Y in the Classic view. With that in mind, we will approach this from the GUI perspective noting any differences for the Classic view.
Enter the following:
Select which Shop Order you wish to print a pick list for. Note, there are multiple options for achieving this:
| 1. | Enter Shop Order number, release number, item, and the warehouse it’s being produced in, for the order you are planning on producing. NOTE: If there is no release (or a release 0 is indicated), you may leave Release # blank. Also, if you use only Main warehouse, leave warehouse blank as well. |
| 2. | Use the lookup for Shop Order number and select the order you wish to print a Traveler for. In Graphical mode and Character mode you can press <F8> while on the Shop order # field to invoke the lookup. In Graphical mode you may click on the Binoculars as well. |
| 3. | If you wish to print Shop Order Travelers for a range of orders, while on the Shop Order Number field, press the <F5> button and you will then be prompted for a range of orders. The selection criteria changes a bit. You will no longer be prompted for item as the assumption is you will be printing on a range of the high level Shop Order numbers. If you have a "job" that contains many Shop Orders sharing the same number, this technique will allow you to use the same starting and ending Shop Order number to print all of the Travelers for all exploded orders within the "job": |
Sequence by primary stock location
If you wish to have your materials list print in the order by primary location (entered in Item Masters), you may do so by checking off this box or indicating Y in character mode. If you don’t check this box, or indicate N, your materials list will print in order by item number.
List FIFO/On-hand detail for items
For lot or serialized items, the on-hand detail information (which lot or serial numbers are in stock) may optionally be printed below the item on the materials list. This can be useful for deciding which lot or serialized item you should be picking from. It will list these in First In First Out Order if you choose to list them. This means your earliest receive lot or serial number will be listed first.
If you enter comments on your Shop Orders (you may enter up to 99 lines on each), you may opt to include those on this document. If you choose to do so, they will print at the bottom of the document below the materials list.
If you wish to include the notes/comments you have defined for the item being produced, you may do so by checking this box or indicating Y in Classic view. This will result in a section appearing on your report called “Item Master Specs”.
With this selection, you will find ALL of the comments available for the item. This may be up to 99 lines of data allowing you to create detailed specifications for any item you produce.
NOTE: This selection will only appear if comments are available.
Include sales order instructions
5. If you wish to include the notes/comments you have defined for the Sales Order line that this Shop Order was produced from (assumes you are creating orders from Sales Order Lines), you may do so by checking this box or indicating Y in Character Mode. This will result in a section appearing on your report called “Sales Order Instructions”. In this section, you will find ALL of the comments available for the Sales Order line item. This may be up to 99 lines of data allowing you to create detailed specifications or special instructions that production may need to see for this customer’s order. NOTE: This section will only appear if comments are available.
Print bar code shop order fields
If you wish to include bar codes on key fields, allowing you to scan information into your system and reduce the risk for data entry errors, you may do so my checking this final box or indicating Y in the Character mode. Assuming you have bar code scanners available on some or all of the computers you perform inventory transactions on, you can opt to scan Shop Order Number, Release, and Item from your document. This can speed up data entry and reduce errors.
NOTE: This option limits which printers you may use; they must be company defined printers, and they must be a PCL5 or later compliant laser printer.
Once you have entered your information, and confirmed/selected your options, you can press OK to print your document(s) or Cancel not to print and return to the menu.
Press Enter at "Field number to change" in Character mode.
You will then be provided with your valid printer options. Again, if no bar codes are included all valid printers are available. If bar codes have been selected, you will only see company defined printers listed, Windows Printers will not be an option.
A Shop Order that has related component Material Requirements records on file must be closed before the Shop Order record can be deleted. The Close Shop Orders program:
| • | Provides an option to automatically issue remaining component material requirements for the order. This feature automatically creates and posts issue transactions for previously unissued component requirement balances. When you select this option, you are given additional alternatives to issue balances of "Controlled items on pick list" and/or "Controlled items not on pick list". This feature should only be used for components where such estimation of actual usage is reasonably accurate. |
| • | Optionally prints a Shop Order Material Usage Variance Analysis indicating actual vs. required (planned) issue quantities for each controlled component and the total materials usage cost variance for the order. |
| • | Optionally creates Material Usage Variance History records, used to report total material usage variances by parent item. |
| • | Adjusts Quantity On Order for the item ordered and Quantity Allocated for components, if there are remaining balances for the Shop Order at the time that it is closed. These adjustments are made to related Item Master or Branch Warehouse Item records. |
| • | Deletes Shop Order Material Requirements records for the order. |
| • | Changes Order Status code to C (Closed) in Shop Order record. |
Select
Close from the Shop orders menu.
The following screen displays:
Insert Screen.
Enter the following information:
* Close date Press ENTER for default System Date displayed, or enter another date in MMDDYY format.
1. Shop order #
Entry Format: Up to 6 alphanumeric characters, or <F1> = "All completed orders".
Comments: "All completed orders" means all orders for which Quantity Received is not less than Quantity Ordered.
Rls
Entry Format: Up to 2 numeric digits, or default of space.
Validation: Shop Order Number and Release Number must match a Shop Order record already on file.
2. Item #
Entry Format: Up to 15 alphanumeric characters, or press <F1> to consecutively display Item Numbers with the Shop Order Number and Release Number you have entered.
Or, press ENTER to default to closing orders for "All" manufactured items made on the Shop Order Number and Release Number that you entered.
Comments: If you entered a specific Item Number, the combination of Shop Order Number, Release Number, and Item Number must match a Shop Order on file.
3. Warehouse
Entry Format: Up to 2 alphanumeric characters.
Default: Warehouse code in the first Shop Order record on file matching your Shop Order Number, Release Number, and Item Number entries is displayed as the default entry, if you did not select "All completed orders" for Shop Order Number.
At this point, if you did not default to "All" for Shop Order Number or Item Number and a Shop Order on file matches your entries, the following order information is displayed:
Sales Order # Due Date
Qty Ordered Start Date
Qty Received Order Status
If the displayed Order Status is already C (Closed), the program will return you to the Shop Order Number entry position; otherwise, you are prompted to enter:
4. Issue remaining component material requirements ?
Entry Format: Y or N. Default displayed is N.
Comment: This option is not available when you select "All completed orders" for Shop Order Number.
5. Print shop order material usage analysis ?
Entry Format: Y or N.
6. Post shop order material usage variance ?
Entry Format: Y to post to Material Usage Variance History File, or N. Defaults to answer in Field 5.
If you answered Y to "Issue remaining component material requirements ?", you are next taken to the "Issue All Materials To a Shop Order" program and requested to enter:
5. Issue controlled items on pick list ?
6. Issue controlled items not on pick list ?
7. Round up fractional requirement qtys ? (to a whole number)
Answer Y or N to these questions. The program will ask "Are you sure ?".
If you answered Y to "Print shop order material usage analysis ?", that report is printed.
If you did not elect to close "All completed orders" the program asks then asks "OK to close shop order ?". Answer Y to start order close processing or answer N to bypass order closing.
If you elected to close "All completed orders" for the requested Warehouse, the program closes orders for which the Quantity Ordered has been Received and prints the Completed Orders Closed List.
This program allows you to delete all closed Shop Orders on file that were closed on or before a date that you specify. This enables you to retain closed Shop Order History on file for a period of time which you determine to be appropriate.
Select
Purge closed from the Shop orders menu.
The following screen displays:
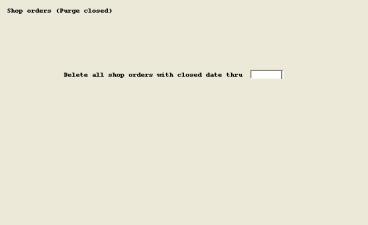
No open Shop Order Items will be deleted by the program, which prompts you with:
Delete all shop orders with closed date thru ______
Enter a date in MMDDYY format. You will then be asked "Are you sure ?". A Y response will result in the deletion of the selected records.